- To move the database to a new SQL server, follow the steps below:
- On the Master Server, go to Start > Administrative Tools > Services, and stop the BMC Client Management Agent service.
Backup the current Database by following below steps :
- Open SQL Server Management Studio on the existing Client Management Microsoft SQL Database Server.
- Login as SA or a SA equivalent account.
- Expand the Databases folder.
- Right-click the Database that needs to be backed up and select Tasks -> Back Up.
- If a file path already appears in the "Destination" window at the bottom, take note of the path and name of the backup file that will be created.
- If a file path does not exist in the window, click the Add button
- Click the ellipse button to the right of the "File name" field.
- In the "File name" field at the bottom of the "Locate Database Files" window, enter the desired path and backup file name. This will be the name of the backup file once the backup is complete.
- Take note of the path where the backup file will be created.
- Click Ok Locate Database Files window and then click Ok to close the "Select Backup Destination" window.
Example:
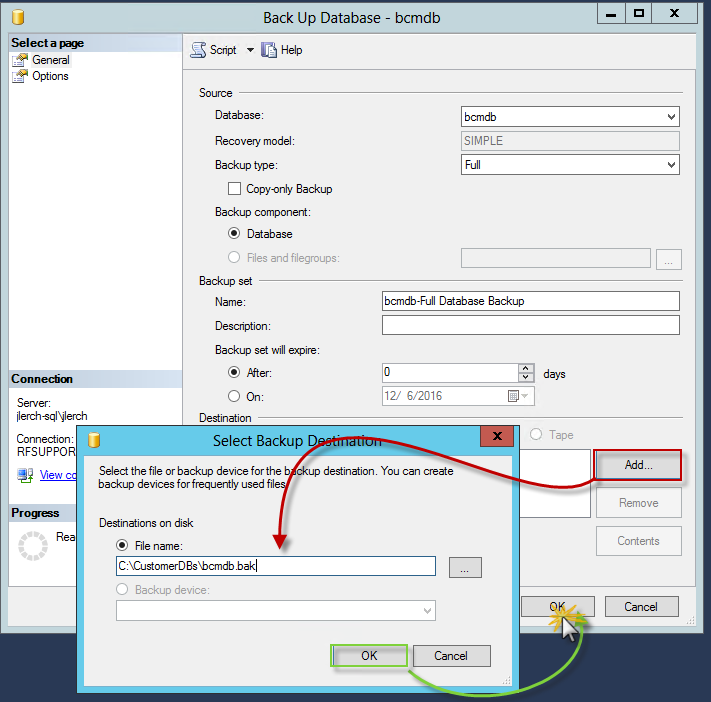
- Click Ok to begin the Database backup.
- Click Ok once the backup is completed successfully.
- Copy the backup file to the new Database server
Restore the database onto the new server
- Open SQL Server Management Studio on the new SQL Database server.
- Login as SA or a SA equivalent account.
- Right-click Databases on the left and select Restore Database.
- In the "Source" section select the Device option, then click on the triple ellipses and select the DB backup file created previously and select OK
- The Destination section will auto-populate, accept the remaining defaults, and select OK and OK again once complete
- Example:
Recreate the SQL login used by the Client Management Service:
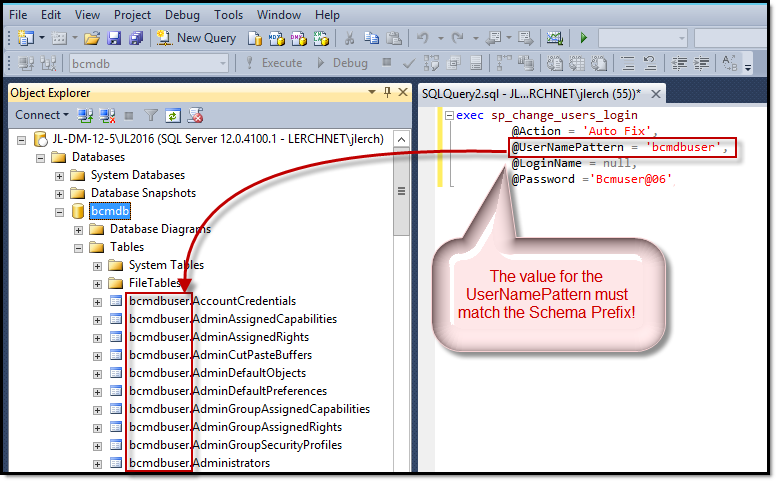
- Expand Databases -> Restored DB Name -> Tables
Note: the schema name that prefixes each Client Management Table
- If the table names do not start with bcmdbuser, one must change line 3 in the query below to match the DB Schema before executing the query.
- Possible names from prior version of Client Management might be:
- Right click on the restored DB name and select "New Query"
- Paste the following query and alter line 3 as needed:
exec sp_change_users_login
@Action = 'Auto_Fix',
@UserNamePattern = 'bcmdbuser',
@LoginName = null,
@Password ='Bcmuser@06'
Update the Client Management Configuration file to use the new SQL Server
- On the Master Server, open the following file for edit:
- C:\Program Files\BMC Software\Client Management\Master\config\Vision64Database.ini
- Update this file to use New DB Server and login password: (Highlighted values indicate the changes required)
[Database]
DatabaseType=odbcdirect

DatabaseName=Driver={ODBC Driver 17 for SQL Server};Server=MyNewSQLServerl\MyInstance;Database=bcmdb

User=bcmdbuser
Password=Bcmuser@06
PasswordEnc=
- Start the Master Server Service
- Monitor the mtxagent.log file to verify the new database connection is working properly.
Note:
- On Service Startup, Password= value in clear text will be read, encrypted, and the configuration file updated to remove the value for Password= and store the Encrypted Password in the PasswordENC= entry.